Skip to content
ShaoPin Cheng
  • 首頁
  • 贊助協作
  • 足球賽事表
  • 帳號資訊
    • 登入
    • 註冊
    • 帳號資訊
      • 訂單
      • 數位產品下載
      • 地址
      • 購物車
    • 登出
    • 遺失密碼
  • Blog

Blog

AIX

Mounting ...

  • 2011 年 1 月 14 日
  • by cjt74392

First, you must install fileset bos.cifs_fs.rte, and optionally bos.cifs_fs.smit for the Smitty interface, from the installation DVD.

To invoke the Smitty interface, run:

root# smitty cifs_fs
The Smitty interface will enable you to do almost anything you need with the CIFS filesystem.

For people aligned the command line way, mounting a share is a two-phase process. First, credentials must be added to the /etc/cifs_fs/cifscred file. After that, you can mount a remote CIFS file system using the credentials specified. You could do the whole thing from the command line, but this is the preferred method in my opinion.

SMBFS can store server/user/password credentials in the /etc/cifs_fs/cifscred file to allow automatic retrieval of passwords when mounting SMBFS. Credentials can be added, changed, and removed from this file with the mkcifscred, chcifscred, and rmcifscred commands.

To add a credential:

root# mkcifscred -h -u -p Use the mkcifsmnt, chcifsmnt, rmcifsmnt, and lscifsmnt commands to add, change, remove, and list, respectively, cifs stanzas in /etc/filesystems.

To mount a file system:

root# mkdir -p /mount/point
root# mkcifsmnt -f /mount/point -h -d -c -w
That will add a new stanza to /etc/filesystems:

/mount/point:
dev =
vfs = cifs
nodename = /&lt:user>
mount = false
options = wrkgrp=
account = false
Automatical mounting during startup can be specified with the -A option to mkcifsmnt. You can give your mounted share a different set of permissions and owners with the -u , -g and the -x options.

新增RHCSA認證 RHCE

新增RHCSA認證

  • 2011 年 1 月 13 日2021 年 3 月 19 日
  • by cjt74392


為了怕一時忘記相關說明,要找找不到,先放到部落格好了.
話說,新的名稱比較貼進於工作內容與事實,也因此多了一張證照.^_^

美國Red Hat公司已於2010年11月10日公告RHEL 6新版本正式上市。詳細Red Hat Enterprise Linux 6(RHEL 6) 介紹,請參考原廠網站:
http://press.redhat.com/2010/11/11/introducing-the-red-hat-certified-system-administrator-rhcsa-certification/
另外,因應RHEL6 上市,Red Hat將公司更新的RHCE新認證制度,自RHEL 6版本起,新增RHCSA認證取代原來的RHCT認證。自RHEL6起的版本,若欲考取RHCE認證,需要依據新認證制度規定通過 RHCSA(Ex200)與RHCE(Ex300)兩科認證考試方能取得RHCE認證。
恆逸特地整理出新舊版認證差異重點與相關建議供您參考了解:

1. 如果您持有的是RHEL 4 版本的RHCE認證
依據Red Hat原來的認證制度規定,新版上市後60天,舊版本將被淘汰,隨著新版本RHEL6 上市後會被淘汰的認證版本是RHEL 4版本,預計淘汰日期為2011年1月9日。對於持有RHEL4舊版本認證的顧客,恆逸給您的建議是,最省錢的方式,是趁著RHEL5考試還可以考的時間,趕快升級RHEL5 版本考試取得認證,欲取得RHEL 5版本的RHCE認證只需要通過一科考試(考試科目代碼RH302),RHEL 5認證有效期可至下一新版本RHEL 7上市後60天。(依據原廠慣例,每一版本更新時間約是1.5-2年之間)恆逸RHEL4舊生升級RHEL5可享有報名與考試最優惠,請洽詢您的所屬業務了解報名優惠細節。
2. 若您已經考過RHEL5版本認證
RHEL 5的認證目前仍是有效版本認證。您可選擇馬上升級RHEL 6新版本認證或者等到RHEL7 出版後再升級新認證,保持認證資格有效性。
3. 新版RHCSA認證將取代RHCT認證嗎?
是的。依據Red Hat的官方說明,RHCSA將取代RHCT認證,RHCSA –原文Red Hat Certified System Administrator (RHCSA) ,這個新認證將成為RHCE核心認證,RHEL6版本起,要取得RHCE都必須要有RHCSA認證才可完成認證取得。新認證制度規定,每一認證有效期限為三年。
4. 新的認證有時效的限制嗎?
有的,依據新的認證規定,RHCSA或RHCE認證有效期限為三年。若是再認證有效期內通過更高階的認證考試,則認證有效期會自動延長三年。舉例說明 2011年1月20日考到RHCSA認證,認證有效期至2014年1月19日,又於2011年3月20日考過RHCE,則原來的RHCSA認證自動延長至 2014年3月19日。
5. 如果我是RHEL4版本的RHCE,是否會影響我現在正在準備RHCA的考試?
因為RHEL 4 預計於2011年1月9日淘汰,而依據RHCA考試規定,必須要是Current RHCE,建議您可於RHEL 4淘汰前趕快把RHCA相關考試考完,完成RHCA認證取得。超過2011年1月9日之後,就需要再加考RHEL5或RHEL6 取得有效中的RHCE資格了。
6. 請問RHCSA考試價格是多少?
台灣地區考試費用尚未訂出,相關課程或考試訂出後,恆逸將另行通知。請您留意網站公告或者UCOM Express電子報。

Nagvis的應用範例 Nagios

Nagvis的應用...

  • 2010 年 10 月 25 日2021 年 3 月 19 日
  • by cjt74392

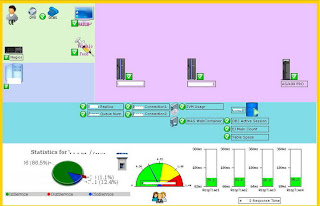
如果你喜歡Nagios圖型化的監控,
那麼你一定會喜歡用Nagvis這個套件去滿足你老闆的視覺.
以下是我的圖型範例(我的美工不好,多多關照)

Nagios Plug In (Dash 及 AS/400) Nagios

Nagios Pl...

  • 2010 年 10 月 25 日
  • by cjt74392

日前寫了兩個Nagios的插件,在浩瀚的自由軟體世界 再次 貢獻我的心力.

很榮幸獲得很多人的肯定.並給了我4~5顆星的評等.請享用.
歡迎先進同輩指教.當然也樂於問題詢問.

Nagios Dash from NDOUtils

Nagios Dash from NDOUtils Forked Nagios Dashboard – PHP and select data from NDOUTILS DB. Easy to monitor Unhandled error only.

/Category:Web Interfaces
LicenseGPL

check_as400

check_as400 Nagios plugin to monitor IBM AS400.

/Category:IBM
LicenseGPL
GLPI中文化 GLPI

GLPI中文化

  • 2010 年 10 月 25 日2021 年 3 月 19 日
  • by cjt74392

GLPI是幫助企業進行資產管理及問題管理Help Desk的利器(免費)

在0.78版本中我已完成繁體中文化的工作,
並註冊為GLPI繁體中文化工作者,已完成共計1840個辭句
翻譯.
如有翻譯不完整或錯誤的地方,歡迎留言來信

2011/02/10 新增說明
GLPI 0.80新增服務水準協議(SLA)的統計選項,
主要是給需要做ITIL,BSC評分卡或是KPI的人使用,
目前我已經進行 GLPI 0.80的中文化,已完成96%,如果翻譯上有甚麼問題,請留言.

另外,以下是我找到較完整的OCS and GLPI 安裝與設定說明,請享用.

English : OCS and GLPI installation guide

Lisez le Guide d’installation d’OCS et GLPI en français.

This is a quick installation Guide for OCS Inventory NG and GLPI.

Prerequisites

This guide is designed for Fedora, RHEL and CentOS distributions which provides RPM of OCS and GLPI in their official repositories (also available here, you need to activate my repository).

We consider the server is freshly installed : MySQL is not installed nor configured.

This article was writen with OCS version 1.02 RC3 and GLPI 0.71.2.

In this tutorial, I use rootsecret, ocssecret, glpisecret, syncsecret as password, of course, you should use other values…

The database server

MySQL installation, launch and activation :

# yum install mysql-server
# service mysqld start
# chkconfig mysqld on

Some security on the server : we must change the database administrator password, drop the test database, disable anonymous access, etc:

# mysql_secure_installation

If you’ve completed all of the above steps, your MySQL installation should now be secure. (We will consider the root password is set to rootsecret)

OCS Inventory NG

Installation :

# yum install ocsinventory
# service httpd restart
# chkconfig httpd on

Configuration and database schema creation :

Connect to http://localhost/ocsreports/install.php (must be modified if you are connected to the server from another computer).

  • Step 1 : enter the MySQL administrator login and password, then Send.
  • Step 2 : schema creation. If all is ok (must be true using the RPM), clic on Send
  • Step 3 : installation final step. write somewhere the account created (admin/admin) and clic on Click here to enter OCS-NG GUI.
  • Step 4 : choose your language (using the flag on the right top)
  • Step 5 : connect to the application (admin/admin)

Congratulations. You have OCS installed !

Some required configuration options : open the pipe wrench / Configuration / Config and then the Server tabs:

  • LOGLEVEL = On (really usefull when you encounter an issue)
  • PROLOG_FREQ = 24 (time between 2 inventory)
  • AUTO_DUPLICATE_LVL = crtieria used to detect that 2 computers are the same (I use Model + Serial + Mac Address).
  • TRACE_DELETED = On (required by GLPI).
  • SESSION_VALIDITY_TIME = 600 (session duration, the empty value provided is not valid).

Changing the application admin password is also really a good idea (don’t forget it) : use the “key” icon on the right top.

During the installation step a new database ocsweb is created and a MySQL account ocs with a default password = ocs, which is really not secure.

We need to change the MySQL password :

# mysql -uroot -prootsecret
mysql> UPDATE mysql.user SET Password = PASSWORD('ocssecret') WHERE User = 'ocs';
mysql> FLUSH PRIVILEGES;
mysql> exit

And to update the configuration file with this new password :

In the /etc/httpd/conf.d/ocsinventory-server.conf file (arround line 31) :

PerlSetVar OCS_DB_PWD ocssecret

In the /etc/ocsinventory/ocsinventory-reports/dbconfig.inc.php file :

$_SESSION["PSWD_BASE"]="ocssecret"

Tell apache to reload his configuration for perl module to read the new parameter value:

# service httpd reload

First computer

To test the inventory feature, we are going to install the inventory agent on a first computer. Of course it will be on our server.

# yum install ocsinventory-agent

Now, send the inventory:

# ocsinventory-agent --server=localhost

If all is ok, your server should be in the computer list in OCS.

You can enable the automatic inventory of this computer, edit the /etc/sysconfig/ocsinventory-agent:

OCSMODE[0]=cron
OCSSERVER[0]=http://localhost/ocsinventory

GLPI

To start, we are going to create the database schema and the MySQL accounts for GLPI. Using the administrator (root) account is really a bad idea. The glpi account will be used by the application, and the synchro account for the synchronizaton process (to read the ocsweb database from glpi with only minimum rights).

N.B. in this example, the synchro user rights are reduce to the minimal. In the case you want to use some special plugins (uninstall p.e.), full right are required.

# mysql -uroot -prootsecret
mysql> CREATE USER 'glpi'@'%' IDENTIFIED BY 'glpisecret';
mysql> GRANT USAGE ON *.* TO 'glpi'@'%' IDENTIFIED BY 'glpisecret';
mysql> CREATE DATABASE IF NOT EXISTS `glpi` ;
mysql> GRANT ALL PRIVILEGES ON `glpi`.* TO 'glpi'@'%';
mysql> CREATE USER 'synchro'@'%' IDENTIFIED BY 'syncsecret';
mysql> GRANT USAGE ON *.* TO 'synchro'@'%' IDENTIFIED BY 'syncsecret';
mysql> GRANT SELECT ON `ocsweb`.* TO 'synchro'@'%';
mysql> GRANT DELETE ON `ocsweb`.`deleted_equiv` TO 'synchro'@'%';
mysql> GRANT UPDATE (`CHECKSUM`) ON `ocsweb`.`hardware` TO 'synchro'@'%';
mysql> FLUSH PRIVILEGES;
mysql> exit

Installation :

# yum install glpi
# service httpd reload

Database schema creation and configuration

Connect to the application : http://localhost/glpi/ it will launch the configuration wizard.

  • select your language and : OK.
  • read and accept the license (GPL) : Continue
  • start the installation : Installation
  • step 0 : prerequisites check (must be ok with the RPM) : Continue
  • step 1 : enter the database connexion parameters (localhost / glpi / glpisecret) : Continue
  • step 2 : select the glpi database and Continue
  • step 3 : write somewhere the adminstrateur login and password (glpi/glpi) et Continue
  • step 4 : also write the other account informations : Use GLPI
  • Authentificate yourself with the new account : glpi/glpi

Congratulations (again) : you have GLPI installed !

OCSNG mode configuration

OCSNG mode activation :

  • Menu Setup / General
  • Restrictions tabs
  • Activate OCSNG mode : Yes, and Post

Server Configuration :

  • Menu Setup / OCSNG mode
  • Select the server created during installation: localhost
  • Name: My OCS Server
  • OCSweb host: localhost
  • Name of the OCS database: ocsweb
  • OCSweb database user: synchro
  • OCSweb user password: syncsecret
  • Post

You must get the Connection to OCS database successful message.

Now, we must configure the informations that will be imported from OCS to GLPI. Here is a few examples :

  • Monitors : Unit import on Serial number
  • Logiciels : Unit Import
  • Use the software dictionary of OCS: No
  • Number of computers to synchronize using the cron: 0 (we are going to use another solution)
  • General informations Computers : Yes for all that you are interested by.
  • Components : Yes for what you want.
  • etc, etc (you should notice that a lot of behavior are configurable)
  • Post

Check :

  • Menu Tools / OCSNG
  • Import new computers

In the displayed list, you should see your server (on which we have installed the agent). Don’t ask for it to be imported as we are going to see how to use automatic synchronization.

Automatic OCSNG synchronization

This step is not required as the internal pseudo–cron integrated in GLPI also do an automatic synchronization. But this solution seems more cumfortable and flexible (at least, for me).

We are going to use the Mass import from OCSNG plugin.

Disconnect from GLPI (logout link) and install the plugin:

# yum install glpi-mass-ocs-import

Connect into GLPI to install / configure the plugin :

  • Menu Setup / Plugins
  • Link : OCS massive Import
  • Link : Install OCS massive import plugin (plugin tables creation)
  • Default OCS server: My OCS Server
  • Post the configuration page
  • Enable the synchronization

The planified task configured by the RPM will be launched every 5 minutes. Be patient, your first computer should be imported into GLPI.

Tu supervise the synchronization :

  • Menu : Plugins / OCS Massive Import
  • Tab : Informations about scripts execution

Conclusion

We have configured one of the best inventory and asset management solution in a few minutes (probably the best, as it isOpenSource)

You can now continue to deploy the inventory agent on your other computers, it’s available for most OS.

Take also some time to read the official documentation to be able to tune your configuration to fully suite your need:

  • OCS Documentation
  • GLPI Documentation

Don’t forget than OpenSource projects exists thanks to their community and to their users contributions. So when you’ll have seen what OCS and GLPI can do for you, don’t forget to do something for this projects:

  • OCS NG donations
  • Contribute to GLPI

Comments and support

Of course, comments on this guide are welcome and could be posted here. For support questions, please, use each application official forums:

  • OCS Forums
  • GLPI Forums
  • Forums – Les RPM de Remi for questions about this tutorial or the RPM.

Don’t forget to read and to respect forum usage rules.

文章分頁

1 2 3

近期文章

  • XRDP 中文支援相關設定
  • 如何陪伴小一新鮮人,快樂學習健康成長
  • (三國)我今天的手稿創作 Paper painting.
  • AIX 7.1 + Apache 2.4 + PHP libphp5.so with PDO
  • Highcharts for Nagios

近期留言

  • 「Unknown」於〈Nagios Check_as400 PlugIn〉發佈留言
  • 「David Yu」於〈Nagios Check_as400 PlugIn〉發佈留言
  • 「紹斌」於〈Nagios Check_as400 PlugIn〉發佈留言
  • 「Henrik」於〈Nagios Check_as400 PlugIn〉發佈留言
  • 「Unknown」於〈考取CISA的經驗〉發佈留言

彙整

  • 2025 年 6 月
  • 2016 年 9 月
  • 2014 年 11 月
  • 2013 年 2 月
  • 2012 年 10 月
  • 2012 年 9 月
  • 2012 年 8 月
  • 2012 年 6 月
  • 2012 年 5 月
  • 2011 年 11 月
  • 2011 年 10 月
  • 2011 年 8 月
  • 2011 年 4 月
  • 2011 年 3 月
  • 2011 年 2 月
  • 2011 年 1 月
  • 2010 年 10 月

分類

  • AIX
  • AS400
  • CISA
  • GLPI
  • Nagios
  • RHCE
  • Win 7
  • 個人未分類

其他操作

  • 登入
  • 訂閱網站內容的資訊提供
  • 訂閱留言的資訊提供
  • WordPress.org 台灣繁體中文
Theme by Colorlib Powered by WordPress